For our first “Ask the Mechanic” question, we are delving into a seemingly simple, but important question. Our inquirer writes:
I’m kind of embarrassed about this, but I’ve ridden bicycles for a long time and when I go on group rides or I’m around people who talk about various bicycle parts, most of the time, I don’t know what they’re talking about. Do you think you could provide a diagram and an explanation of the major parts of a bicycle and what they do?
Your question is a great one. It’s definitely good to have an understanding of your bicycle, how it works, and the parts that comprise it. This response may be a bit more than you were seeking, but hopefully it will provide a starting point for anyone who is looking to gain information about the various parts of a bicycle.
The diagrams below are provided as a jumping off point with letters and numbers corresponding to the part name below the images. After the component/part name, you will find a more detailed description and/or explanation.

A – Top Tube: This is the horizontal or semi-horizontal tube on the frame of your bicycle that runs between the saddle and the handlebars. A complete frame consists of a top tube, down tube, head tube, seat tube, seat stays and chain stays (Each of these will be described as we move forward).
B – Steerer and Spacers: These are two separate parts of the bicycle, but we'll talk about them both here. The steerer is the upper portion of the bicycle fork that is inserted into the head tube of the bicycle’s frame. Most modern bicycles use spacers over this portion which covers the steerer from view above the head tube. More spacers and a taller steerer have a rider sitting higher while a shorter steerer and fewer spacers will have a rider sitting lower on the handlebars. The fork steerer can be cut down; however, once it’s cut, it cannot be reattached.
C – Stem Cap: The stem cap is the cover bolted onto the top of the steerer above the head tube. This helps compress this portion of the bike and prevents your handlebar stem, and therefore your handlebars from coming off of the bicycle while riding.
D – Stem or Handlebar Stem: This is the portion on a bicycle extending from the steerer to the handlebars. These come in various lengths and move the handlebars closer or farther from the rider and also come in a variety of degrees to place the handlebars lower or higher.
Older and some specialty bicycles use what is called a quill stem. These are most commonly found on pre -1990s bicycles. In this case, the entire piece is inserted into the head tube and extends out in front of the rider as a single unit.
E – Hoods: This is the rubbery area of the handlebar that extends out in front of the rider toward the brake levers.
F – Brake Levers/Shifters (sometimes called “brifters”): These are the levers used to brake and shift on the handlebars. In the case of this particular photo example, the single part has two different functions: braking and shifting (hence the term brifters). Each brand works slightly different from one another, but they all have the same purpose.
There are other varieties of shifters and brakes however that are not a combination of both functions. Thumb shifters, downtube shifters (which are also sometimes used as or called bar-end shifters), twist shifters, and trigger shifters. When using any of these, the brake lever is a separate part attached to the handlebar.
Depending on the handlebar used, some of these are more useful and/or effective than others.
G – Handlebar: On a road bike, most commonly found are “drop” bars like those pictured on the Bianchi image above, but there are all different types of handlebars (too many really to list here). A few different types include: flat bars, moustache bars, albatross bars, trekking bars, northroad bars, and so on. Handlebars come in different shapes and styles to suit different types of riding and riders and there are variations in size and angles even among the same designation. Depending on the bike ridden and individual preferences, you may find one style to be the best for a particular type of bike or riding.

For road biking, the most common type of handlebar is a drop bar which consists of four different areas: the flats/tops, the ramps, the hooks, and the drops.
H – Brake/Shifter Cables and Housing: These are the cables running from the shift levers to the derailleur and from the brake levers to the brakes. The portion that is generally seen on the bicycle is housing covering the actual brake cable.
I – Brakes: Brakes are generally separated into two categories: Rim or Disc brakes (Not as common, there are also drum brakes sometimes found on older bicycles or cruiser bikes). In the case of the photo example of the Bianchi, it is set up to use rim brakes, meaning that the caliper squeezes the rim in order to stop the bike. When using disc brakes, the caliper squeezes onto the rotor to stop the bike, as is illustrated in the KHS city bicycle photo.
Brakes come in a few different varieties (cantilever, v-brakes, caliper, roller, disc, etc.). Both rim and disc brakes require pads that need to be replaced as they wear out. Disc brakes come in mechanical or hydraulic varieties. Generally, the bicycle frame dictates which type of brake can be used.
J – Head Tube: The head tube is the semi-vertical portion of the frame at the front (or the farthest point of the frame while standing over the bicycle). The head tube houses the fork steerer and keeps the fork and frame together via a headset.
K – Fork: This is the part that connects the frame to the front wheel. Like frames, they come in a variety of materials including steel, aluminum and carbon.
L – Hub: This is the portion at the center of a wheel that allows the wheel to turn. The hub is also the point of attachment for the fork and rear dropouts.
M – Down Tube: The diagonal portion of the frame that connects the head tube to the seat tube.
N – Bottle Cage Mount: Generally, there are two bottle cage mount locations: top of the down tube and the inside portion of the bottom or middle of the seat tube used to mount water bottle cages to the frame. Some frames have these in other or additional locations, such as on the bottom side of the down tube, while other bicycles, such as some very small frames or mixte frames can be manufactured with only one mount on the upper side of the down tube.
O – Crank or specifically pointed out here, Crank Arm: The crank consists of two arms, a spindle, and 1-3 chainrings. The arms are the long portion of a bicycle’s crankset that connect via a spindle through the bottom bracket and allows for pedal attachment. Available in a variety of lengths, the most commonly found are 165mm, 170mm, 172.5mm or 175mm. Less commonly, a range of lengths from 150-200mm can be found.
P – Front Derailleur: Found near the bottom of a bicycle’s seat tube, this part will be found on bicycles with more than one chainring. Its function is to allow the chain to move between chainrings. These come in different sizes, primarily dependent on the diameter of the frame’s seat tube. Usually front derailleurs are either a clamp-on or a braze-on unit.
Q – Chain: Consisting of small links that connect to each other, this allows power to transfer from the human pushing the pedals to the drivetrain which then propels the bicycle forward.
R – Valve Stem: This is the small stem protruding from a hole in the rim of a bicycle’s wheel. The size of this pre-drilled hole determines the type of valve that is used. The valve itself is used to put air into the tube to inflate the tires, and each type of valve requires a different inflation head on the bicycle pump. In the U.S., the two most common valve-types are Schrader or Presta (In other countries, you may find Dunlop valves which look like a thicker version of a Presta valve).
S – Chainstays: The chainstays connect the rear wheel to the bicycle’s frame. These are the two arms that go around the rear wheel and extend from the bottom bracket shell to the hub of the rear wheel.
T – Rear Derailleur: The mechanical unit found toward the rear of the drive-side of a bicycle that moves the chain to each cog on the cassette. It is only found on non-internally geared bicycles (It’s unnecessary for single speed or fixed gear bicycles and internally geared bicycles have a sealed hub that permits shifting. An example of an internally geared bicycle is found on the second bicycle image. You will note that no derailleur exists on this bike because it is geared internally).
U – Spokes: The thin, long, rods that connect the hub to the rim of the wheel. The spokes, hub and rim of a wheel combine to create structural strength and flexibility.
V – Cassette: Generally mounted to the rear bicycle hub, the cassette consists of several, varying sized sprockets that, combined with the chainrings on the crank allow the bicycle to move with more or less difficulty.
W – Tire: The rubber portion around the exterior of the wheel that has actual contact with the road surface being ridden.
X – Rim: The outer portion of the wheel that holds the tire in place. The rim is connected to the hub of the wheel via spokes.
Y – Seat stays: Seat stays run diagonally down the rear of a bicycle frame and connect the seat tube to the chainstays/rear dropouts.
Z – Seat tube: The seat tube is the semi-vertical tube on the frame that connects the top tube to the down tube and chain/seat stays.
1 – Seat collar/clamp: This is a small, circular, metal clamp that is used to hold the seat post in place and prevent the saddle from moving or slipping into the seat tube.
2 – Saddle/Seat: The portion of the bicycle that the rider sits on to pedal a bicycle. It is connected via rails/clamp to the seat post and can be positioned at different degrees of tilt and can be moved up and down via the seat post.
3 – Headset: The headset is a set of small pieces that are installed at the head tube to allow the fork to rotate.
4 – Chainrings: Part of a crank, a chainring is an individual, circular piece with teeth that allows the chain to rotate without falling.
5 – Bottom Bracket: Mounted inside the bottom bracket shell at the connection point of the seat tube, down tube and chainstays, the bottom bracket allows the crank to attach to the bicycle. The bearings inside allow the cranks to rotate.
6 – Inner Tube (or just Tube): Placed between the wheel rim and the outer tire, the tube holds air as it is inflated with a pump or other device. When you get a flat, unless it is quite severe (in which case the entire tire may need replacement), this is the portion that will be patched or replaced to get you moving again.
7 – Seat post: The metal rod that connects the saddle to the bicycle and is inserted into the seat tube. The size is dependent upon the seat tube diameter, and they are available in a variety of setbacks.
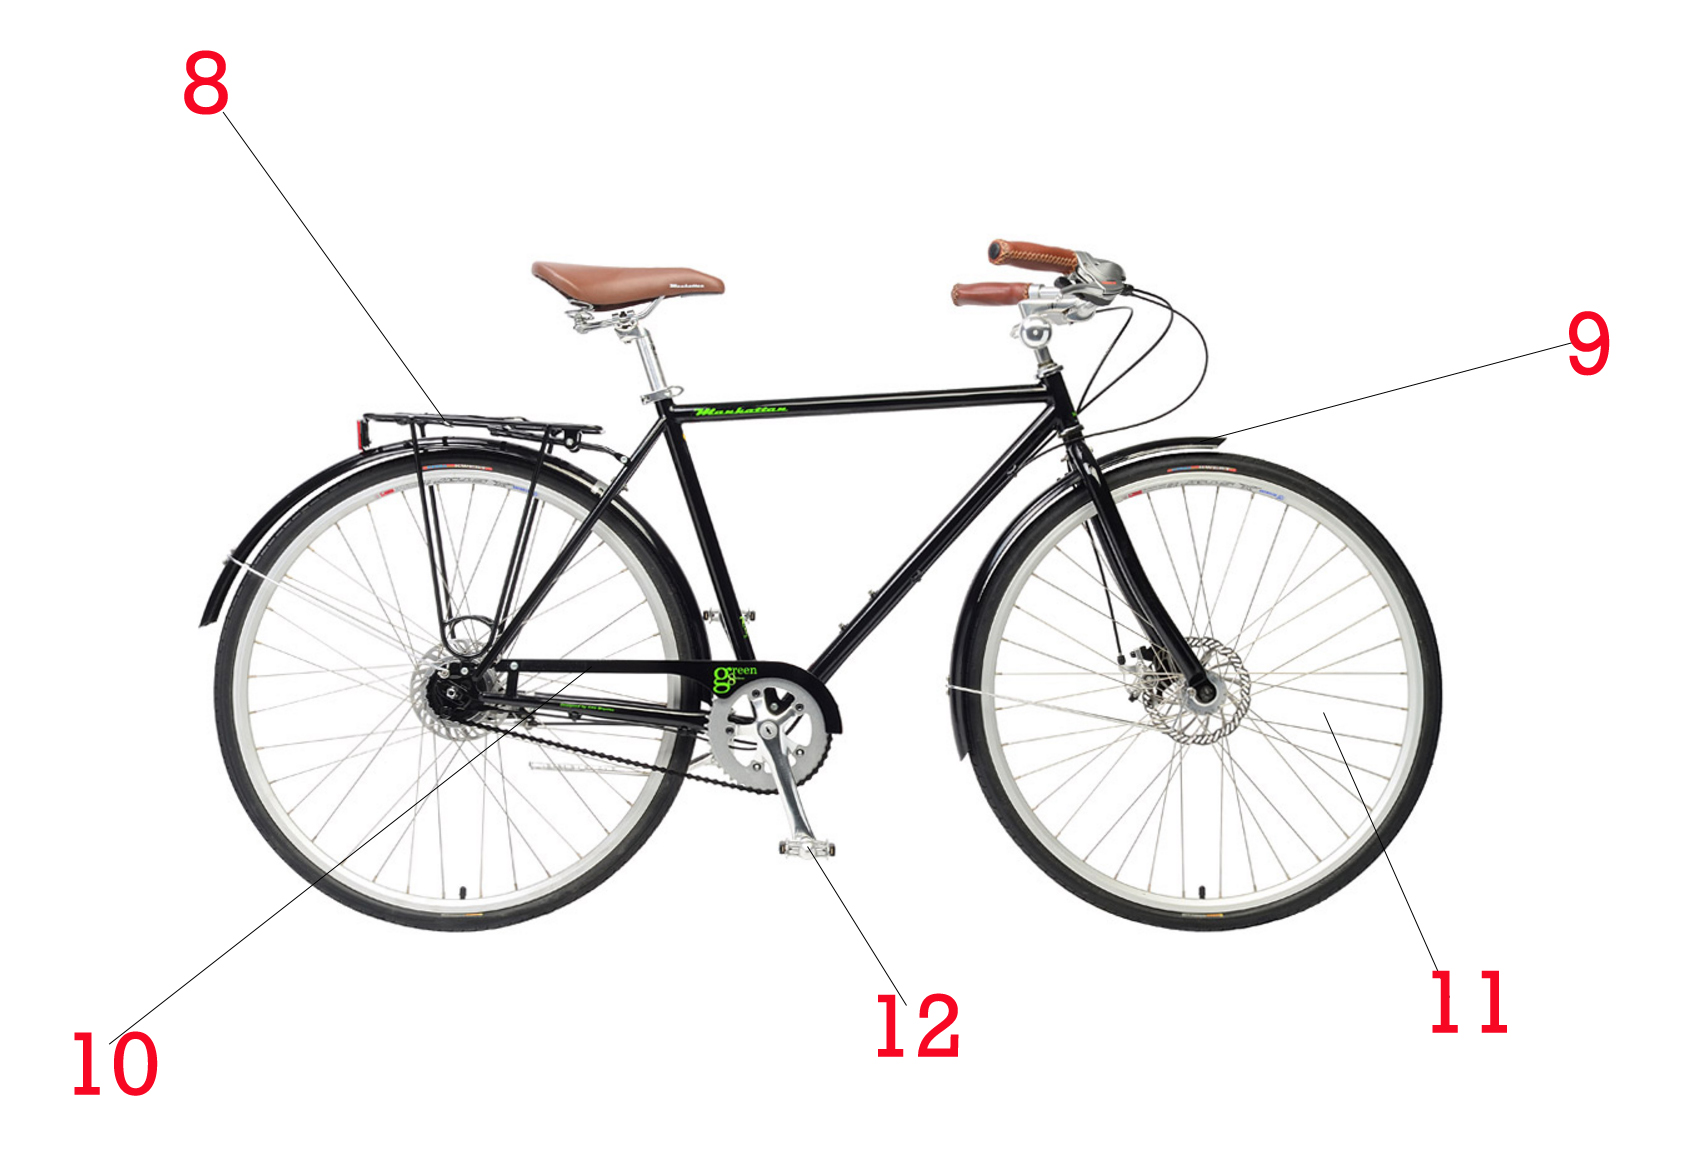
8 – Rear Rack: A rack mounted to the rear of the bicycle that allows for transport of items. Sometimes, a front rack is used instead (found on the front of the bicycle, rather than the rear) or in addition to a rear rack. Often times, riders will attach panniers or baskets to these to aid with transporting larger or extra goods.
9 – Fenders: The half-circular metal or plastic piece found at the top of the tires, this piece allows the rider to keep most water, dirt and grime from splashing onto the riders’ body while in motion. Some people use them on road bikes when the weather turns to rain or snow, while others leave them on year round.
10 – Chainguard: Not found on all bicycles, the chainguard can assist with keeping pants and/or legs free of grime and grease from the bicycle’s chain. Generally, these are used on non-sport type bicycles to allow for everyday clothing use on the bike.
11 – Wheel: Composed of a hub, spokes, and a rim, the wheel is the portion of your bicycle shaped like a big circle. The come in tubular and clincher varieties (Tubular wheels do not require inner tubes, while a clincher will use both the inner tube and tire).
12 - Pedals: Pedals are connected to the ends of the crank arms and allow the rider to push and provide the necessary energy to move the bicycle. They come in many different types and varieties. Some require special shoes and cleats and can be quite small, while others can be ridden in any type of shoe. Rider preference and the type of bicycle generally help choose which type will be used.
For a fairly simple machine, there are actually quite a few parts that make up an entire bicycle. There are also a variety of other small parts and pieces that could be discussed, but these are the most likely to come up when conversing about bicycles. As always, if you ever have questions about a part or component on your bicycle, feel free to call or stop by Long Mont Velo and we can have a chat.
If you have your own “Ask the Mechanic” questions, please email longmontvelo@gmail.com with your inquiry.